
Take your own
Impressions.

4
After 4 minutes, push your index fingers up into your cheeks until you feel the rim of the tray and GENTLY prize down until the tray comes free. Rinse with cold water and allow to dry naturally.
NB. Do not remove the putty from the impression tray. Send it back in the tray.
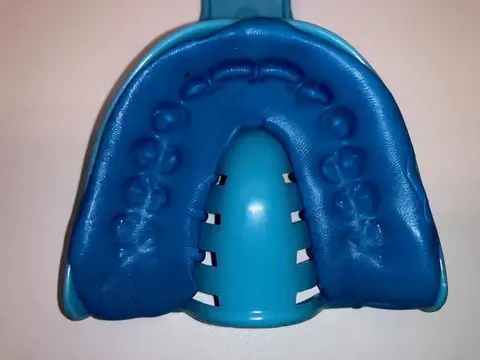
GOOD IMPRESSION
You can see all of your teeth clearly in the impression tray.
You can see a deep outline of your gum above your teeth.
Now repeat these steps for your lower impression.
Impression return bag with your name on.


3
Firmly pushing the tray upwards make sure you lift your top lip up and out of the way whilst pushing the tray straight up into your teeth. This is because we need an impression of your gums too, not only your teeth. Do this until your teeth hit the bottom of the tray and hold in position with thumbs for 4 minutes, do not speak.
2
Now you have your upper tray and your putties ready. Mix the putties together in your hand until they form a putty of one uniform colour. There must be no streaks of white. You have 1 minute to get them mixed quickly before they go hard,
Roll into a sausage and place into the impression tray. Like shown.
1
Select upper tray. The upper tray is the full tray.
Practice putting the tray in your mouth before starting the process. If you find that the impression tray is too large or too small. Please contact us before using the impression putty and we can then send out replacement trays. Please contact us if you are unsure about the impression tray size.
Please wash your hands. Take 2 pots of putty 1 x blue and 1 x white out of the tubs and place them in your hand - Please note once they touch each other they will set hard within 60 seconds. So just get them ready but not touching.
Examples of bad impressions
Too Shallow
You need to bite deep enough into the putty to fully capture your gum line. It’s not enough to simply capture the tips of your teeth. Gently bite all the way down until you feel your teeth come in light contact with the bottom of the tray.

Side Hit
Line up your teeth over the center of the tray before you bite down. If your teeth are too far to one side or too far forward or backward, you will hit the sides of the tray.

Improper mixing
The base and catalyst must be fully mixed so it’s one solid color. If there are any swirls of the original putty colors, the putty won’t fully set, so it can’t completely capture your impressions. Always be sure to mix thoroughly until you’ve achieved one solid color.
Nearly done!
You pay the postage to send your impressions to us and the postage for your finished order, as shown at checkout. Everything we send is tracked. For overseas orders, we cover the import charges into your country. Production starts when your impressions arrive and pass our check. Standard production is 11 working days.
